Visual Regression for V5

We are pleased to announce that we now have a new Visual Regression service for WebdriverIO V5 called wdio-image-comparison-service.

What can it do?#

wdio-image-comparison-service is a lightweight WebdriverIO service for browsers / mobile browsers / hybrid apps to do image comparison on screens, elements or full page screens.

You can:

  • save or compare screens / elements / full page screens against a baseline
  • automatically create a baseline when no baseline is there
  • blockout custom regions and even automatically exclude a status and or tool bars (mobile only) during a comparison
  • increase the element dimensions screenshots
  • use different comparison methods
  • and much more, see the options here

The module is now based on the power of the new webdriver-image-comparison module. This is a lightweight module to retrieve the needed data and screenshots for all browsers / devices. The comparison power comes from ResembleJS. If you want to compare images online you can check the online tool.

It can be used for:

  • desktop browsers (Chrome / Firefox / Safari / Internet Explorer 11 / Microsoft Edge)
  • mobile / tablet browsers (Chrome / Safari on emulators / real devices) via Appium
  • Hybrid apps via Appium

For versions check below:

Sauce Test Status

Installation#

Install this module locally with the following command to be used as a (dev-)dependency:

npm install --save-dev wdio-image-comparison-service

Instructions on how to install WebdriverIO can be found here.

Usage#

wdio-image-comparison-service supports NodeJS 8 or higher

Configuration#

wdio-image-comparison-service is a service so it can be used as a normal service. You can set it up in your wdio.conf.js file with the following:

const { join } = require('path');
// wdio.conf.js
exports.config = {
// ...
// =====
// Setup
// =====
services: [
['image-comparison',
// The options
{
// Some options, see the docs for more
baselineFolder: join(process.cwd(), './tests/sauceLabsBaseline/'),
formatImageName: '{tag}-{logName}-{width}x{height}',
screenshotPath: join(process.cwd(), '.tmp/'),
savePerInstance: true,
autoSaveBaseline: true,
blockOutStatusBar: true,
blockOutToolBar: true,
// ... more options
}],
],
// ...
};

More plugin options can be found here.

Writing tests#

wdio-image-comparison-service is framework agnostic, meaning that you can use it with all the frameworks WebdriverIO supports like Jasmine|Mocha. You can use it like this:

describe('Example', () => {
beforeEach(() => {
browser.url('https://webdriver.io');
});
it('should save some screenshots', () => {
// Save a screen
browser.saveScreen('examplePaged', { /* some options*/ });
// Save an element
browser.saveElement($('#element-id'), 'firstButtonElement', { /* some options*/ });
// Save a full page screens
browser.saveFullPageScreen('fullPage', { /* some options*/ });
});
it('should compare successful with a baseline', () => {
// Check a screen
expect(browser.checkScreen('examplePaged', { /* some options*/ })).toEqual(0);
// Check an element
expect(browser.checkElement($('#element-id'), 'firstButtonElement', { /* some options*/ })).toEqual(0);
// Check a full page screens
expect(browser.checkFullPageScreen('fullPage', { /* some options*/ })).toEqual(0);
});
});

If you run for the first time without having a baseline the check-methods will reject the promise with the following warning:

#####################################################################################
Baseline image not found, save the actual image manually to the baseline.
The image can be found here:
/Users/wswebcreation/Git/wdio-image-comparison-service/.tmp/actual/desktop_chrome/examplePage-chrome-latest-1366x768.png
If you want the module to auto save a non existing image to the baseline you
can provide 'autoSaveBaseline: true' to the options.
#####################################################################################

This means that the current screenshot is saved in the actual folder and you manually need to copy it to your baseline. If you instantiate wdio-image-comparison-service with autoSaveBaseline: true the image will automatically be saved into the baseline folder.

Nice new feature#

When you create a fullpage screenshot you might have some elements that stay in the view, like a stickyheader or a chatbox. These elements normally mess up the screenshot like you can see on the left side of the below image.

But you can now add elements that need to be hidden after the first scroll which will give you a result as you can see in the right side of the below image. This can be done by adding this property to your test:
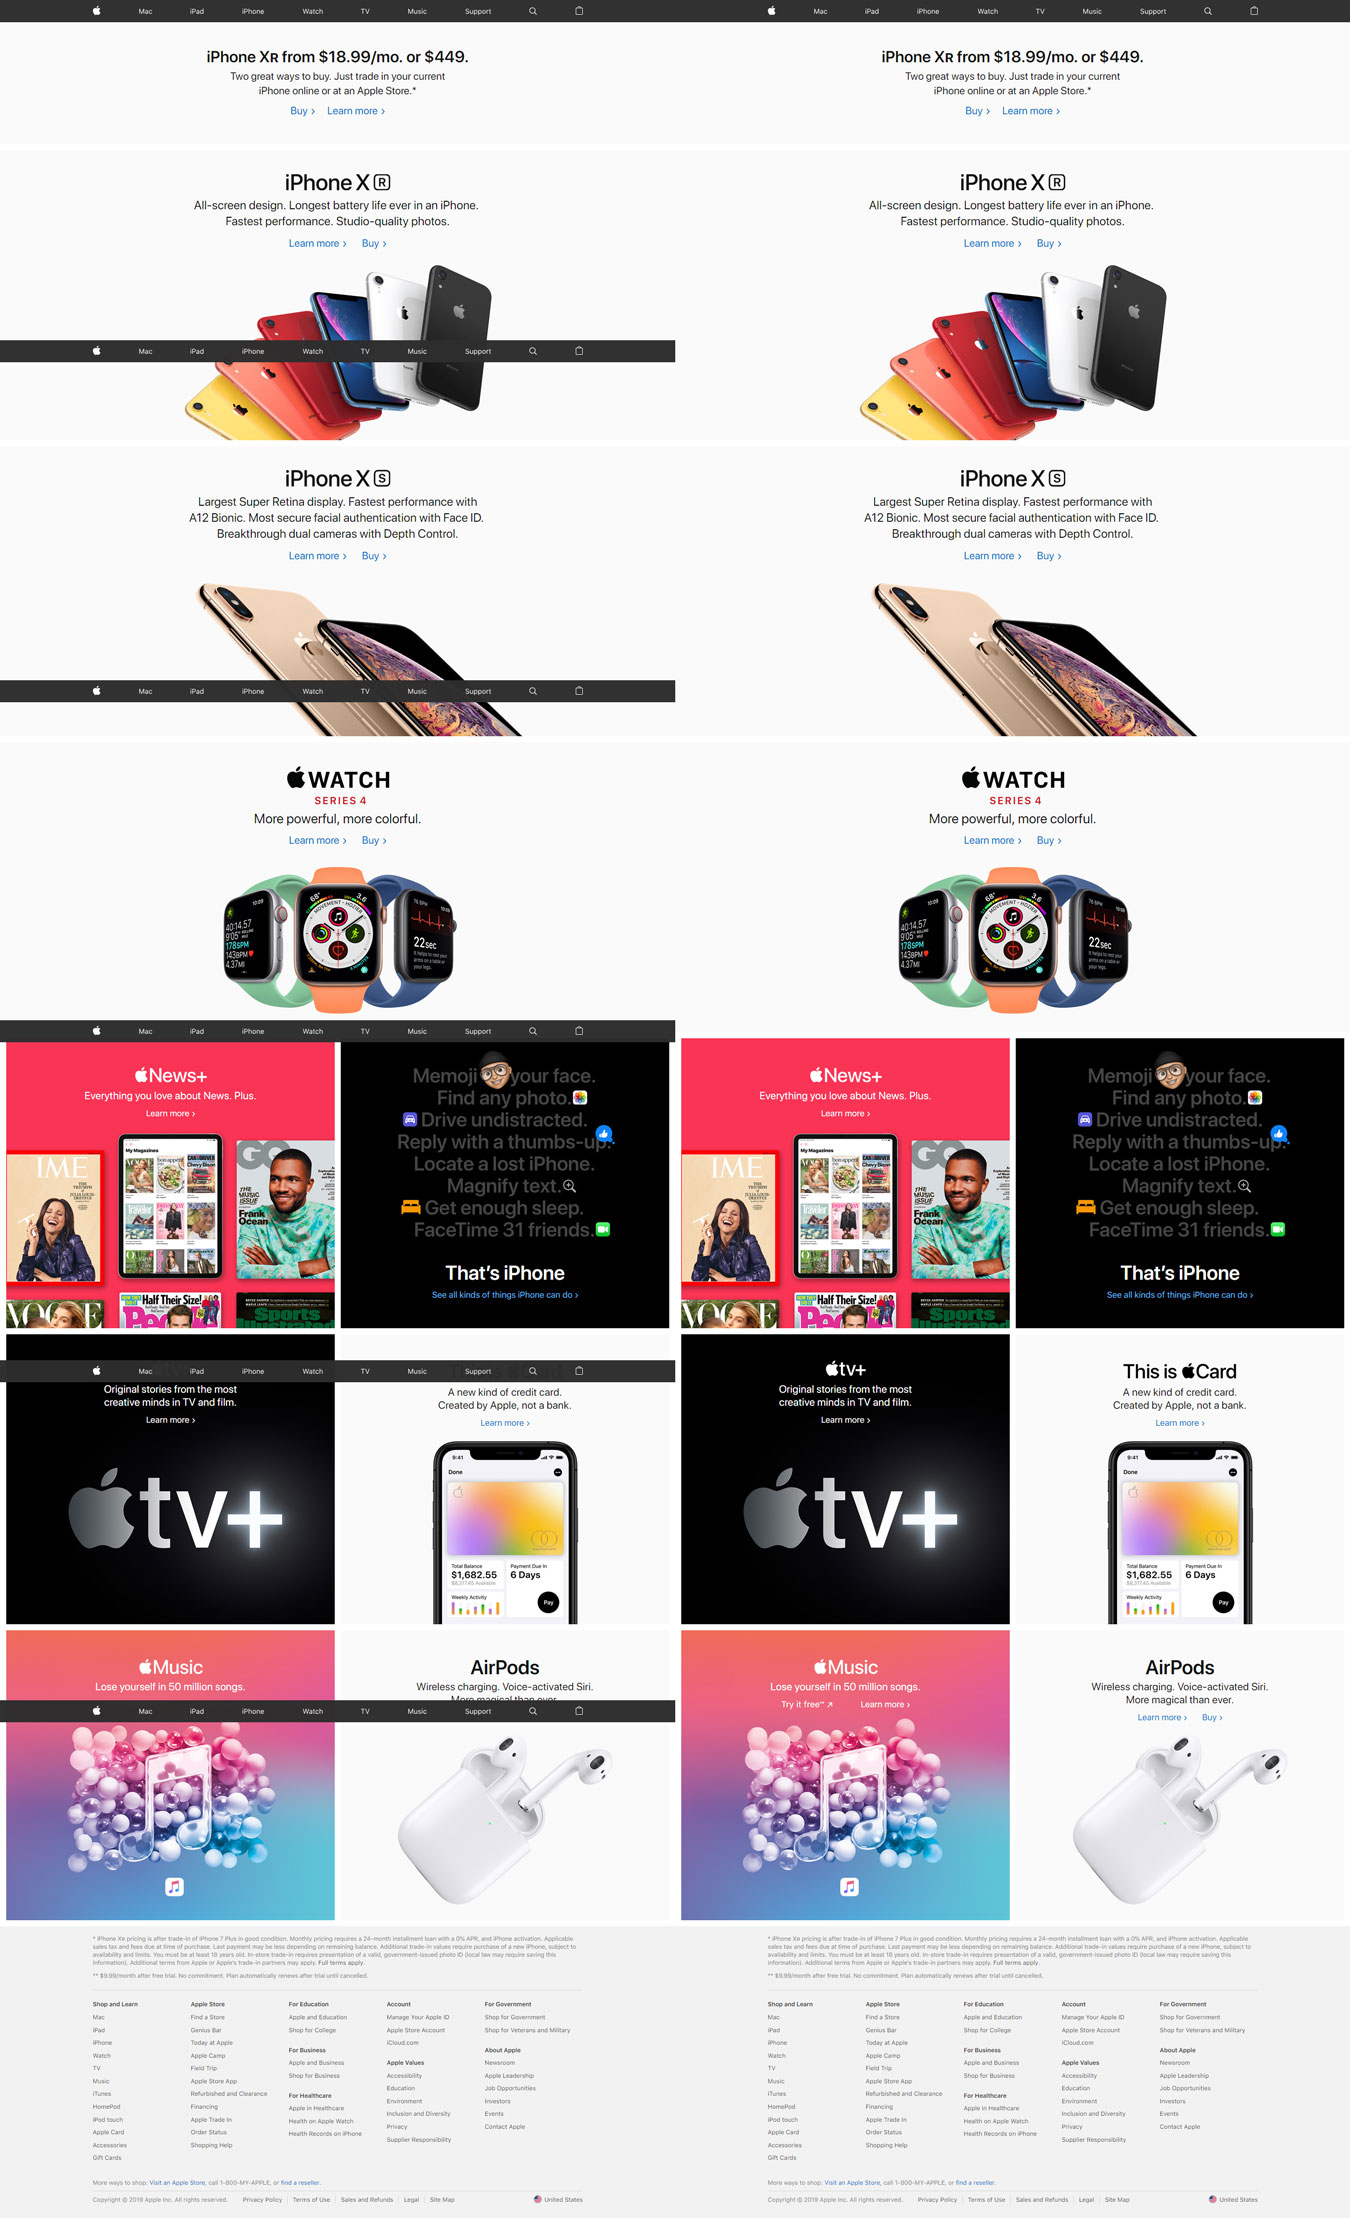
browser.checkFullPageScreen('fullPage', {
hideAfterFirstScroll: [
$('nav-bar'),
$('chat-box'),
],
});

fullpage-example

Test result outputs#

The save(Screen/Element/FullPageScreen) methods will provide the following information after the method has been executed:

const saveResult = {
// The device pixel ratio of the instance that has run
devicePixelRatio: 1,
// The formatted filename, this depends on the options `formatImageName`
fileName: 'examplePage-chrome-latest-1366x768.png',
// The path where the actual screenshot file can be found
path: '/Users/wswebcreation/Git/wdio-image-comparison-service/.tmp/actual/desktop_chrome',
};

See the Save output section in the output docs for the images.

By default the check(Screen/Element/FullPageScreen) methods will only provide a mismatch percentage like 1.23, but when the plugin has the options returnAllCompareData: true the following information is provided after the method has been executed:

const checkResult = {
// The formatted filename, this depends on the options `formatImageName`
fileName: 'examplePage-chrome-headless-latest-1366x768.png',
folders: {
// The actual folder and the file name
actual: '/Users/wswebcreation/Git/wdio-image-comparison-service/.tmp/actual/desktop_chrome/examplePage-chrome-headless-latest-1366x768.png',
// The baseline folder and the file name
baseline: '/Users/wswebcreation/Git/wdio-image-comparison-service/localBaseline/desktop_chrome/examplePage-chrome-headless-latest-1366x768.png',
// This following folder is optional and only if there is a mismatch
// The folder that holds the diffs and the file name
diff: '/Users/wswebcreation/Git/wdio-image-comparison-service/.tmp/diff/desktop_chrome/examplePage-chrome-headless-latest-1366x768.png',
},
// The mismatch percentage
misMatchPercentage: 2.34
};

See the Check output on failure section in the output docs for the images.

Support#

If you need support you can find me on the wdio-image-comparison-service- Gitter channel, or click on this link Gitter chat

Happy testing!

Grtz,

The Blue Guy

React Selectors

ReactJS is one of the most widely use Front-End libraries in the web. Along side React, many developers use styling tools that will minify or re-write the class attribute values attached to the HTML elements via className props in JSX. These minifications and overwrites make it difficult to select the generated HTML using the WebDriver's query commands like findElement or findElements since it's not guaranteed that the class name will remain the same.

Today we introduce two new commands, browser.react$ and browser.react$$, to WebdriverIO's browser object that allows you to query for a single or multiple React component instances in the page with an easy to use API. These new commands will return the WebdriverIO element(s) for the query in where you will have access to the complete element commands API.

Usage#

Internally, WebdriverIO uses a library called resq to query React's VirtualDOM in order to retrieve the nodes. This library allows WebdriverIO to find any component in the VirtualDOM by the component's name and also filter this selection by state and/or props.

WebdriverIO's provided API, browser.react$ and browser.react$$, methods have three parameters. The first parameter is the selector to query, this parameter is required. The second and third parameters are optional filters, props and state respectively.

const selector = 'MyComponent'
const propFilter = { someProp: true }
const stateFilter = 'this is my state'
browser.react$(selector, {
props: propFilter,
state: stateFilter
})

In the examples we will cover basic usages for all three parameters.

Examples#

In the following examples, we will base our queries against this example React application.

// mycomponent.jsx
import React from 'react'
import ReactDOM from 'react-dom'
const MyComponent = (props) => {
const { name } = props;
const [state] = React.useState(name === 'there' ? ', how are you?' : '')
return (
<div>
Hello {name || 'World'}{state}
</div>
)
}
ReactDOM.render(
<div>
<MyComponent />
<MyComponent name="Barry"/>
<MyComponent name="WebdriverIO"/>
<MyComponent name="there"/>
</div>,
document.getElementById('#root'),
)

In this app, we have one component that renders some text depending on the property name passed to it.

Selecting and filtering#

Now, let's say we want to test that the first instance of MyComponent is correctly displayed in the browser. Well, with the browser.react$ command, we can select this first instance and then query against it.

// spec/mycomponent.test.js
test('it should be displayed', () => {
const myComponent = browser.react$('MyComponent')
expect(myComponent.isDisplayed()).toBe(true) // pass
})

Simple, no? But what if we want to select the component that says Hello WebdriverIO and verify that the text is correct? Well, we can filter our queries!

// spec/mycomponent.test.js
test('it should correctly display "Hello WebdriverIO"', () => {
const myComponent = browser.react$('MyComponent', {
props: { name: 'WebdriverIO' }
})
expect(myComponent.getText()).toBe('Hello WebdriverIO') // pass
})

In React, the props will always be an object so for this filter parameter we can only pass an object to be used to filter our results.

You might've noticed that in our component we have a state that adds extra text if the name matches there. We can select this component by filtering the components by their current state.

// spec/mycomponent.test.js
test('it should correctly display "Hello WebdriverIO"', () => {
const myComponent = browser.react$('MyComponent', {
state: ', how are you?'
})
expect(myComponent.getText()).toBe('Hello there, how are you?') // pass
})

As you can see, for the state filter we pass the string that equals to the current state of the component, this last parameter in the function can be any of the following: string, number, boolean, array, or object. This is because all these types are valid state types for React.

What about browser.react$$?#

By now you might be wondering why we are using browser.react$ in all the examples. Well, both commands have the same parameters and work almost the same with the only difference being that browser.react$$ will return an array of all the WebdriverIO elements corresponding to the selector and/or filter match.

Final Words#

We are very pleased with this addition and we hope you can take full advantage of it. We suggest you use React Dev Tools, using this tool will help you see how the components in the application are called, which props they have, and which state they are currently in. Once you know this information, using WebdriverIO's React API will be a lot easier.

Note: This blog post was updated after the v6 release to reflect changes to the command interface.

Shadow DOM Support & reusable component objects

Shadow DOM is one of the key browser features that make up web components. Web components are a really great way to build reusable elements, and are able to scale all the way up to complete web applications. Style encapsulation, the feature that gives shadow DOM it's power, has been a bit of a pain when it comes to E2E or UI testing. Things just got a little easier though, as WebdriverIO v5.5.0 introduced built-in support for shadow DOM via two new commands, shadow$ and shadow$$. Let's dig into what they're all about.

History#

With v0 of the shadow DOM spec, came the /deep/ selector. This special selector made it possible to query inside an element's shadowRoot. Here we're querying for a button that is inside the my-element custom element's shadowRoot:

$('body my-element /deep/ button');

The /deep/ selector was short lived, and is rumored to be replaced some day.

With /deep/ being deprecated and subsequently removed, developers found other ways to get at their shadow elements. The typical approach was to use custom commands in WebdriverIO. These commands used the execute command to string together querySelector and shadowRoot.querySelector calls in order to find elements. This generally worked such that, instead of a basic string query, queries were put into arrays. Each string in the array represented a shadow boundary. Using these commands looked something like this:

const myButton = browser.shadowDomElement(['body my-element', 'button']);

The downside of both the /deep/ selector and the javascript approach was that in order to find an element, the query always needed to start at the document level. This made tests a little unwieldy and hard to maintain. Code like this was not uncommon:

it('submits the form', ()=> {
const myInput = browser.shadowDomElement(BASE_SELECTOR.concat(['my-deeply-nested-element', 'input']));
const myButton = browser.shadowDomElement(BASE_SELECTOR.concat(['my-deeply-nested-element', 'button']));
myInput.setValue('test');
myButton.click();
});

The shadow$ and shadow$$ Commands#

These commands take advantage of the $ command in WebdriverIO v5's ability to use a function selector. They work just like the existing $ and $$ commands in that you call it on an element, but instead of querying an element's light DOM, they query an element's shadow DOM (they fall back to querying light dom if for whatever reason, you're not using any polyfills).

Since they're element commands, it's no longer required to start at the root document when building your queries. Once you have an element, calling element.shadow$('selector') queries inside that element's shadowRoot for the element that matches the given selector. From any element, you can chain $ and shadow$ commands as deeply as needed.

Page Objects#

Like their counterparts, $ and $$, the shadow commands make page objects a breeze to write, read and maintain. Let's assume we're working with a page that looks something like this:

<body>
<my-app>
<app-login></app-login>
</my-app>
</body>

This uses two custom elements, my-app and app-login. We can see that my-app is in the body's light DOM, and inside it's light DOM is an app-login element. An example of a page object to interact with this page might look like so:

class LoginPage {
open() {
browser.url('/login');
}
get app() {
// my-app lives in the document's light DOM
return browser.$('my-app');
}
get login() {
// app-login lives in my-app's light DOM
return this.app.$('app-login');
}
get usernameInput() {
// the username input is inside app-login's shadow DOM
return this.login.shadow$('input #username');
}
get passwordInput() {
// the password input is inside app-login's shadow DOM
return this.login.shadow$('input[type=password]');
}
get submitButton() {
// the submit button is inside app-login's shadow DOM
return this.login.shadow$('button[type=submit]');
}
login(username, password) {
this.login.setValue(username);
this.username.setValue(password);
this.submitButton.click();
}
}

In the example above, you can see how it's easy to leverage the getter methods of your page object to drill further and further into different parts of your application. This keeps your selectors nice and focused. For example, should you decide to move the app-login element around, you only have to change one selector.

Component Objects#

Following the page object pattern is really powerful on its own. The big draw of web components is that you can create reusable elements. The downside with only using page objects though, is that you might end up repeating code and selectors in different page objects to be able to interact with the elements encapsulated in your web components.

The component object pattern attempts to reduce that repetition and move the component's api into an object of its own. We know that in order to interact with an element's shadow DOM, we first need the host element. Using a base class for your component objects makes this pretty straightforward. Here's a bare-bones component base class that takes the host element in its constructor and unrolls that element's queries up to the browser object, so it can be reused in many page objects (or other component objects), without having to know anything about the page itself:

class Component {
constructor(host) {
const selectors = [];
// Crawl back to the browser object, and cache all selectors
while (host.elementId && host.parent) {
selectors.push(host.selector);
host = host.parent;
}
selectors.reverse();
this.selectors_ = selectors;
}
get host() {
// Beginning with the browser object, reselect each element
return this.selectors_.reduce((element, selector) => element.$(selector), browser);
}
}
module.exports = Component;

We can then write a subclass for our app-login component:

const Component = require('./component');
class Login extends Component {
get usernameInput() {
return this.host.shadow$('input #username');
}
get passwordInput() {
return this.host.shadow$('input[type=password]');
}
get submitButton() {
return this.login.shadow$('button[type=submit]');
}
login(username, password) {
this.usernameInput.setValue(username);
this.passwordInput.setValue(password);
this.submitButton.click();
}
}
module.exports = Login;

Finally, we can use the component object inside our login page object:

const Login = require('./components/login');
class LoginPage {
open() {
browser.url('/login');
}
get app() {
return browser.$('my-app');
}
get loginComponent() {
// return a new instance of our login component object
return new Login(this.app.$('app-login'));
}
}

This component object can now be used in tests for any page or section of your app that uses an app-login web component, without having to know about how that component is structured. If you later decide to change the internal structure of the web component, you only need to update the component object.

Future#

Currently the WebDriver protocol does not provide native support for shadow DOM, but there has been progress made for it. Once the spec is finalized, WebdriverIO will implement the spec. There's a decent chance that the shadow commands will change under the hood, but I'm pretty confident that they're usage will be the same as it is today, and that test code that uses them will need little to no refactoring.

Browser Support#

IE11-Edge: Shadow DOM is not supported in IE or Edge, but can be polyfilled. The shadow commands work great with the polyfills.

Firefox: Calling setValue(value) on an input field in Firefox results in an error, complaining that the input is "not reachable by keyboard". A workaround for now is to use a custom command (or method on your component object) that sets the input field's value via browser.execute(function).

Safari: WebdriverIO has some safety mechanisms to help mitigate issues with stale element references. This is a really nice feature but unfortunately Safari's webdriver does not provide the proper error response when attempting to interact with what in other browsers, is a stale element reference. This is unfortunate but at the same time, it's generally a bad practice to cache element references. Stale element references are typically completely mitigated by using the page and component object patterns outlined above.

Chrome: it just works. 🎉